Dye Staining Wood Products
Dye staining unfinished wood and wicker projects with Tintex creates unexpected colours and long lasting results Transform items like: decorative chopsticks, rattan, wicker, pinecones beyond the basic wood stain colours. Use a paintbrush, sponge, roller, immersion technique, spray or stencils to create new looks.
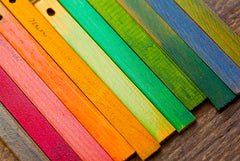
When you use Tintex the natural grain will appear without chipping off or flaking like paint can. Adjust the amount of dye used for the type of wood; soft woods need less Tintex while hardwoods need more dye.
Test dye colour on a small sample before dyeing. Apply dye with a paint brush, foam brush or cloth as needed and allow wood to dry. For deeper or brighter colours reapply more coats of dye. After seal your project with a polyurethane product (follow manufacturer’s directions.
Dye Staining Materials:
- Tintex
- Uninished wood
- Measuring cup
- Spoon
- Gloves
- Plastic cover for workstation
- Plastic bucket, stainless or glass bowl or container
- Optional: sandpaper
- Optional: paintbrush or sponge roller
- Optional: polyurethane
BASIC DYE-STAINING DIRECTIONS:
- Protect your work area with plastic; wear gloves to avoid staining hands.
- Use unfinished wood or if needed, sand before dyeing so dye will penetrate better.
- Thoroughly dissolve Tintex powder with 2 cups (500ml) of hot water (avoid breathing dust, use with adequate ventilation). If needed, add dissolved solution to larger container.
- Choose technique below to apply dye to wood.
- Optional: seal with up to 2 coats of polyurethane with a clean brush. Use fine sandpaper lightly between coats. Remove dust with a cloth and air dry.
- Clean up work workstation using bleach and warm water after dyeing to prevent stains.
Immersion Method
- As a basic example: use up to 8 Cups (2 liters) of hot water, or the amount that will cover the item completely. Adjust amounts as needed for your project.
- Place wood product in dye bath so it is fully submerged.
- Keep summerged longer for darker or brighter colours.
- Check wood every 5 minutes by stirring dye bath or rotating
Brush/Sponge/Roller Method
- Use a bristle or sponge brush foam roller, or scrap fabric to add dye solution
- Apply to solution & evenly spread over entire surface
- Sanding wood immediately reduces unwanted drips or dyeing errors
- Air dry and repeat process again to get desired shade
Spray Dyeing Method
- Fill a spray bottle with prepared dye solution
- Spray dye over wood to create different patterns
- Let set for 10 through 20 minutes and pat excess off with a scrap piece of fabric
Stencil Dyeing Method
- Apply stencil with tape.
- Use a brush or roller to apply dye, blotting excess.
- Apply dye toward the centre and work outward.
- After a couple of minutes remove stencil and air dry


