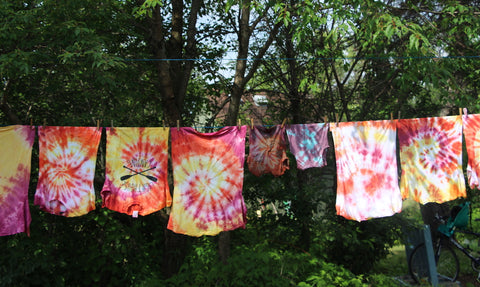
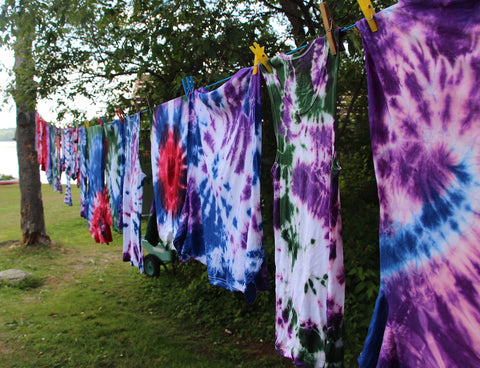
Tie Dyeing
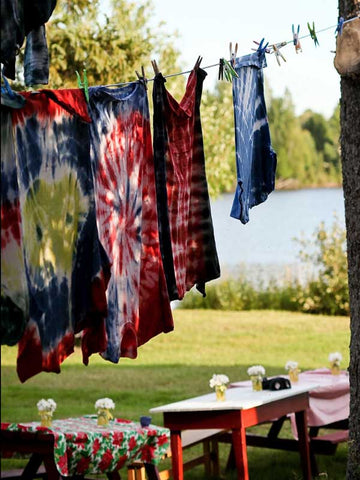 Tie dye is one of the most popular dyeing techniques. It is an easy way to add personality to plain fabric that everyone can do.
The colour wheel can be helpful for tie-dyeing projects. Dyes blend into interesting patterns while they make new colours. The elastic or string creates divisions of base colour in a tie-dye design. Use thicker string or more elastic for wider lines; use more elastic/string to get additional base colour showing through your design. See the 5 classic tie dye techniques for more info.
- Select the colours you would like to use. Plan the order you would like the colours to be placed onto your fabric.
- Use clean and damp fabric: roll into a tube, spin, fold or pleat.
- Always tightly secure elastic to stop colour bleeding. Leave a small amount of space on either side of the elastic free of dye when using a squeeze bottle method.
Optional: you can quickly plan more complicated folded designs on paper before using your fabric [ex: fold paper and draw half the design (heart, smiley face etc.) with a pencil, practice gathering paper along the line and securing with elastic/tape before using your fabric.
Keep dye in contact with fabric longer for brighter or deeper colours. For more vibrant colours, cover tie-dyed fabric in plastic and wrap overnight. The next day, rinse with elastics on until water runs clear; remove elastics, rinse thoroughly and wash as usual.
SQUEEZE BOTTLE METHOD
- Use rubber or plastic gloves to prevent staining hands, protect work area with plastic wrap and/or newspaper.
- Wash fabric before dyeing (avoid fabric softener), fabric must be clean and stay damp.
- Plan design on paper first or immediately start securing pleated and folded fabric with elastic or string.
- Use a kettle or microwave to heat water, have the solution cool slightly before carefully pouring into a plastic squeeze bottle. Thoroughly dissolve Tintex powder with 2 cups (500ml) of hot water. Adjust dye colour intensity to suit your project.
- Pour dye using the squirt bottle over your prepared fabric.
- *Optional: cover tie dyed fabric in plastic wrap and set aside overnight.
- Rinse your fabric until water runs clear and air dry.
- Optional: use a warm iron to set design.
- Clean the workstation using bleach and warm water after tie-dyeing to avoid staining.
-
Wash fabric in warm water with laundry detergent, alone or with similar colours.
BUCKET DIPPING METHOD
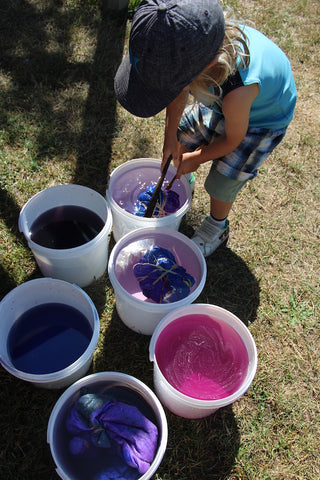
- Wash fabric before dyeing (avoid fabric softener), fabric must be clean and stay damp.
- Plan design first or plan design on paper first or immediately start securing pleated and folded fabric with elastic or string.
- Add Tintex to enough water so fabric is completely covered (ex: you may use 7.5 liters (2 gallons) of hot water or more/less as needed). Stir dyebath until dye is completely dissolved.
- Dip prepared fabric tube into dyebath and repeat as needed for different colours.
- Immerse fabric in dyebath, stir occasionally to agitate fabric.
- Remove material when it is slightly darker than the desired colour.
- *Optional: cover tie dyed fabric in plastic wrap and set aside overnight.
- Rinse item in cold water every time it is removed from a different coloured dyebath.
- Allow water to run over the dyed area until water rinses clear, gently squeeze fabric to remove extra water, but do not wring.
- Carefully remove the rubber bands or string using scissors and rinse again.
- Allow the item to air-dry and iron at low setting when it is slightly damp.
- Clean the workstation using bleach and warm water after tie-dyeing to avoid staining.
- Wash fabric in warm water with laundry detergent, alone or with similar colours.


