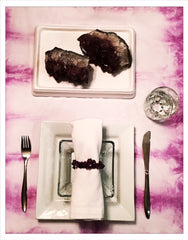
Folded Dyeing Technique
This is an easy DIY project that adds a lovely tie dye effect to fabric (napkins, placemats, tablecloths, pillowcases or even T-shirts). No extra supplies like elastic bands or string are needed. All you need to do is plan the design by selecting the colours you would like to use (the colour wheel has more information). Plan the order you would like the colours to be placed onto your fabric folds if you are using more than one colour. This method is one of the classic 5 tie dye techniques that you can use.
Materials Needed:
- Tintex Fabric Dye colour of choice (darker colours use double the usual amount & pastels use less dye)
- White cotton fabric
- Measuring cup
- Measuring spoons
- Plastic bucket, glass or stainless steel bowls
Directions:
- Start with clean damp fabric and prepare dye solution as usual.
- Fold fabric in half, fold again and again so you have many layers (try 6, 8 or 10 depending on fabric thickness)
- Dye fabric: apply dye solution evenly to folded edges with a plastic squirt bottle. Saturate both sides of your folded fabric edges (use just one colour or try alternating primary, secondary or complementary colours or any other combination).
- Cover dye with plastic wrap and set aside for a few hours or overnight to set.
- Rinse fabric until water runs clear. Wash and dry fabric as usual, you may also set design with a warm iron if preferred.
Colour Splash Blog Related Posts
-
Dyed Paper Garland Tree Decoration
We DIY-ed a standard white paper garland from a craft sto...
-
Holiday Crafts and Decorations
How would you like to add a pop of bold red to holiday gi...


